In the field of invisible orthodontic manufacturing, 3D printed dental molds have become an indispensable manufacturing tool. The combination of user-friendly invisible orthodontic design software and easy-to-use 3D printers has promoted the development of invisible orthodontic technology and made it possible for dental clinics to realize invisible orthodontic chair-side production.
The application experience of Melissa Shotell, an orthodontist with experience in invisible orthodontic design and 3D printed chairside applications, shared the application experience, she shared how to choose the design software and 3D printer required for invisible orthodontic chairside applications, and How to choose between “horizontal printing” and “vertical printing” when printing the 3D printed dental mold required for orthodontic manufacturing.
How to choose software and equipment?
The usability of the software and the simplicity of the workflow are critical to promoting chairside applications, and the user interface has quickly become one of the main defining attributes when choosing software or 3D printers.
In the field of invisible orthodontic design, some companies put a lot of effort into developing easy-to-use software. The way in which software and printers are integrated is usually a key aspect of printer usability.
When choosing invisible orthodontic design software or 3D printer, it is important to consider how the two work together, that is, you need to understand how printing software (CAM) and design software (CAD) work together. The CAM software controls the printer and the actual 3D printing process. The CAD software is the software that initiates the simulation of the movement of the teeth and creates the tooth model. The tooth model is used to make invisible aligners. The process of CAM and CAD working together is called “CAD / CAM” or “Computer Aided Design and Computer Aided Manufacturing”.
When CAD and CAM are coordinated and potentially connected (as shown in the screenshot of the uLab software), a seamless workflow can enhance the simplicity of 3D printing applications. When the CAD software allows the user to calibrate its print pattern to match the 3D printer, seamless transmission can be carried out, and the user can perform 3D printing of the orthodontic dental model through some effective steps.
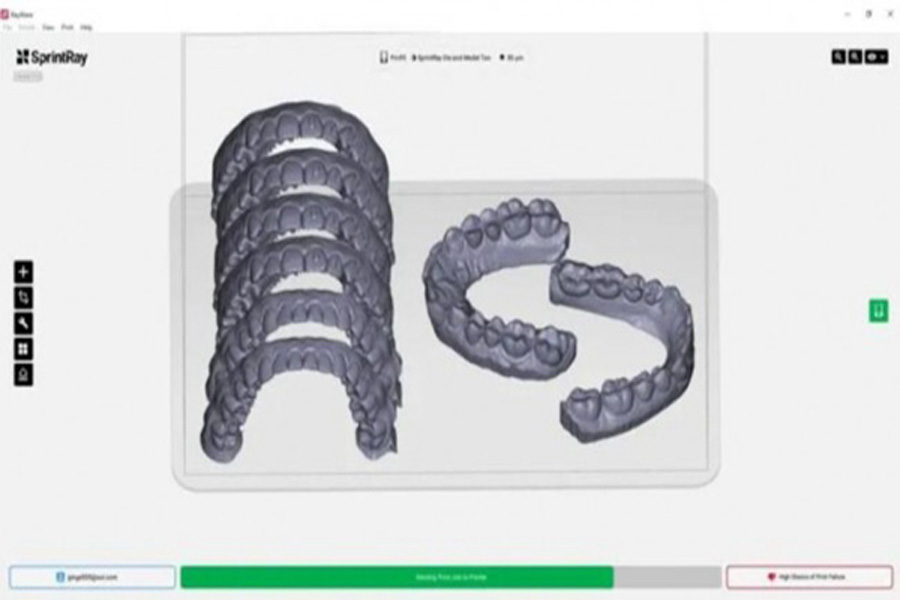
As shown in the screenshot of the Archform software, the CAD software also has the function of automatically modifying the model output into a solid or hollow model for 3D printing. In addition, Archform software has the function of setting the dental model to print horizontally or vertically. This function allows dental users to set the printing direction of the dental model when designing the treatment plan. The latest version of uLab software also adds the function of vertical printing of dental models. In this software, the printing direction is selected in the global setting function. The dentist can change each job before opening the patient’s medical record.
Print horizontally or vertically?
The horizontal or vertical printing of dental models is a controversial topic. According to the experience of the dentist MELISSA SHOTELL, many desktop 3D printers are accurate enough for invisible orthodontic dental molds when printing horizontally or vertically. How to choose during operation mainly depends on the user’s preference. Although there are many factors that determine user preferences, the primary reason is the speed of 3D printing.
When printing a dental model, the 3D printer builds and prints layer by layer from the bottom to the top of the model. The printing speed of the horizontally placed model should be faster than that of the vertically placed model. Although there are some differences between the types of 3D printers, they are usually similar for 3D printers based on DLP or cDLP processes.
Usually, the printing work is carried out while the patient is waiting for treatment. At this time, the advantage of choosing the horizontal printing method is that it can obtain a faster speed and shorten the waiting time. However, the size of the 3D printing equipment construction platform is limited, and different dental mold printing directions will affect the maximum quantity that can be obtained for each printing. If the models are printed vertically, they have a smaller footprint and can print a larger number of models in one printing cycle.
In terms of print quality, vertical printing usually results in an increase in the visible layer line of the anterior tooth face. This is in contrast to horizontal printing, which usually produces visible layer lines on the occlusal surface of the posterior teeth and the tongue surface of the anterior teeth. These phenomena are the result of the DLP projector in the 3D printing equipment layering the resin to form pixels. Although this appearance will not affect the quality of the final invisible aligner, some patients may mind the result. Exterior Problems.
Some 3D printers have optimized the production of dental molds. For example, Nextdent 5100 can realize automatic stacking and printing of dental molds. This function can be realized through the built-in 3D Sprint software. The stack printing function combines printing speed with printing accuracy, which can meet the production needs of large laboratories. In the laboratory of Dr. MELISSA SHOTELL, two such printers can print up to 40 models in about two hours. In addition, the printer also has a special smoothing function, which can improve the appearance of stepped stacks produced by vertically printed dental molds.
When a dentist or technician needs to make a decision on the horizontal printing and vertical printing of the model, it is important to choose the individual printing time based on the model required for rapid printing and the mass printing time required for mass production. When selecting software and evaluating printing options, it is important to evaluate the printing needs of the dental office before selecting the software to be used for treatment planning and invisible orthodontic design.


